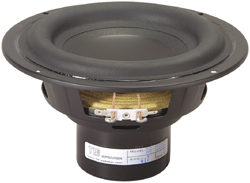
IntroductionCerberus is a character from Greek mythology that is a three-headed monster hound who guards the entrance to the Greek underworld. So despite the small 6.5" driver this woofer has a lot of bark. The project uses the Tang Band W6-1139SC 6.5 subwoofer along with the Dayton SA70 70 watt subwoofer plate amplifier. The enclosure is an 11" vented cube tuned to 36 Hz with an f3 of 35 Hz. At its rated power of 60 watts the Cerberus can reach levels just over 100 dB with no excursion problems until you get below 25 Hz. I designed this subwoofer to be a mate to the Microbe design and the output levels are well matched. The complete design can be built for around $100 which is quite a bargain.DriversTang Band W6-1139SC 6.5" Subwoofer
Specifications: Power Handling: 50 watts RMS/100 watts max *VCdia: 1-1/2" *Impedance: 4 ohms *Re: 3.6 ohms *Frequency range: 35-800 Hz *Fs: 35 Hz *SPL: 85 dB 1W/1m *Vas: .51 cu.ft. *Qms: 2.81 *Qes: .32 *Qts: .32 *Xmax 11.5 mm *Dimensions: A: 7", B: 5-1/2", C: 3-5/8" 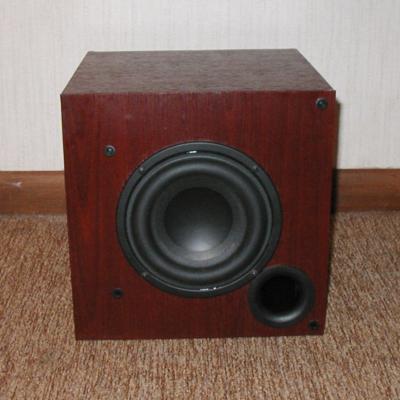
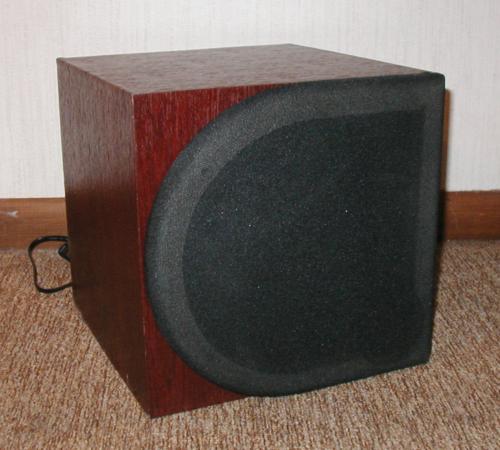
Cabinet DesignThe Cerberus cabinet is an 11" cube with about 12 liters of internal volume once you factor in the space taken by the port and the amp. The port is a 1.5" diameter flared port. The port tuning is 36 Hz and results in an f3 around 35 Hz. The cabinet is a bit larger than typically required for this driver but it produces an EBS (Extended Bass Shelf) alignment that lowers the f3 by using a larger cabinet with a lower port tuning frequency. The larger cabinet causes the response to rolloff higher in frequency but at a lower slope. The key with this type of design is to tune the port low enough so that there is little or no peak in the response at that frequency. My design has a slight peak in this region but it is not severe. The power handling for this type of design might actually be better at lower frequencies due to the lower port tuning frequency. You might think that the port diameter is too small for a 6.5" subwoofer and there is a little bit of port noise with bass notes in the 30-40 Hz range at high levels but with music playing the port noise isn't noticeable (I only noticed it when I ran high level bass sweeps in that frequency range). If you wanted to try a larger port you would have to angle it to the left about 6-7" into the cabinet and you might be able to fit a 2" flared port but you would also probably have to move the driver to the up and left to make room for the larger port. I'm wondering if a modified version of this design using one or two 6.5" passive radiators (I like two for symmetry) on the side(s) of the cabinet might sound better because you'll still get a decent f3 but won't have to deal with the port noise although the passive radiators would probably boost the cost slightly.The cabinet can be made from two pieces of 12" x 48" x 3/4" MDF shelving or a single piece of 2' x 4' x 3/4" MDF. There is a board cutting diagram on the blueprint. A grill is optional but I chose to include one since there is plenty of extra MDF. If you choose to use a grill you'll have to buy some grill posts and grill cloth. The amplifier had to be offset to one side to make room for the port. The 1.5" flared port is available from Parts Express but only in 4" lengths. I was going to use two of them back to back and have flares on both ends but the flared end on the inside interfered with the amp placement so instead I only left the baffle side of the port flared. To get the 7.5" length I took the extra port and cut off just the flared section right up to the edge of the flare "fins". Then since the flared ports are tapered I placed the cut end of the cut port onto the end of the full flared port and it fits snugly with a little bit of overlap with a nice and snug fit. If you want you can glue or tape them together like this. The port hole opening is a tad larger than 2.5" in diameter so I just cut the hole to 2.5" and used a spindle sander to make it just large enough for the port to fit snug. I used Parts Express cherry vinyl laminate to finish the cabinet. You can finish one cabinet with about 34" of vinyl, which comes in 24" wide by 10' long rolls. First cut the 24" wide piece of vinyl into two 12" strips. I wrapped the first strip from one side of the cabinet to the top of the cabinet to the other side of the cabinet and then trimmed the edges. Then I wrapped the other piece from the front to the bottom to the back of the cabinet and then trimmed the edges. The tricky part with applying the veneer this way is getting the vinyl tight in the corners when you wrap it over. I didn't do the best job of this and there is a little bit of bubbling near the corners. I've heard that people recommend using a hair dryer to get the corners nice. I might try this but it might make it easier to use the hair dryer while applying it. Anyways its an easy way to finish the cabinets and a roll of PE vinyl costs about $15. Considering the price, durability and ease of application it is a quick and easy way to finish a cabinet and it doesn't look bad either. Personally I think I prefer the less natural colors like textured silver, textured black and black ash because they don't try to simulate the look of a real wood cabinet but a lot of people seem to like the cherry a lot. For the grill I took a piece of 11"x11"x3/4" MDF and cut an 11" diameter circle out of the left half. Then I left cut out the center leaving a 1" rim and traced the outer port flange size so I could cut around that on the grill. I used a 1/2" roundover bit on the front of the grill to give it a nicer edge. Then I strategically located 4 grill posts for mounting the grill... I used the small PE peg and socket grill posts. I finally covered it with some black grill cloth. 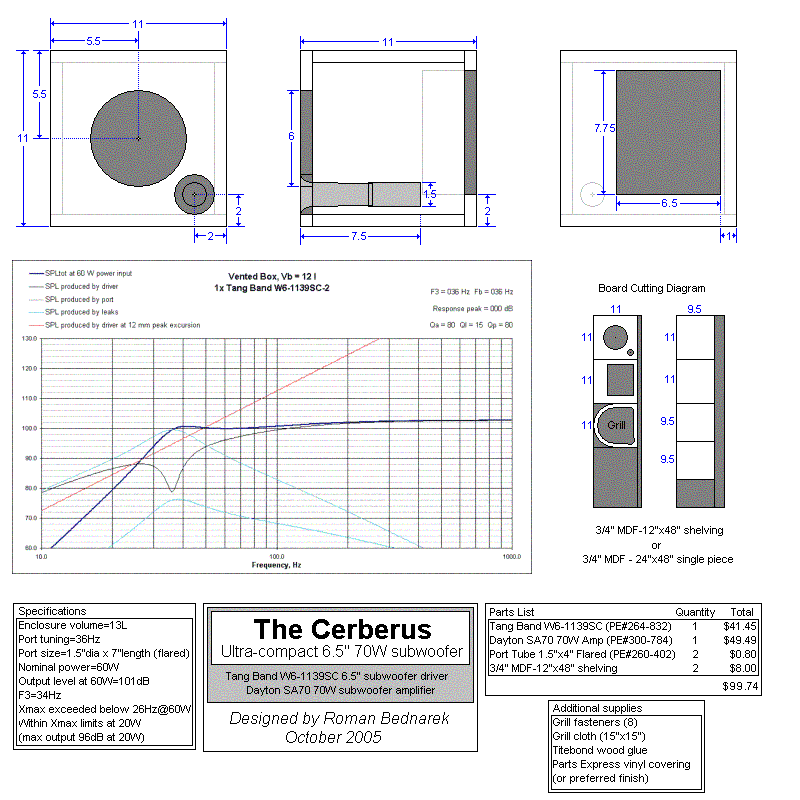
Performance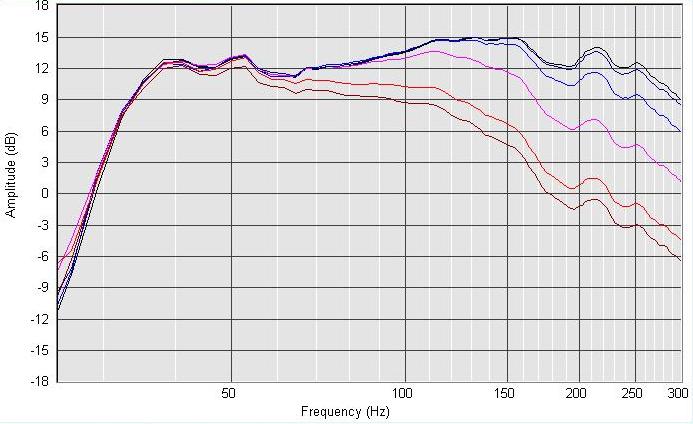

I've only spent a few days listening to this subwoofer (along with the Microbes) and I would have to say that I'm very impressed overall. The thing that really stands out is how deep this little sub can play and at levels high enough that you can actually feel the bass pretty good. I wouldn't say that the bass is quite as clean as a larger 10"+ sealed subwoofer but it is very good nonetheless. If the relative level is kept at a reasonable level and well matched to the output of the main speakers this sub just disappears and it sounds more like you are listening to a large set of three way speakers as opposed to a tiny subwoofer and two small bookshelf speakers. The one complaint that I have is there is a little bit of port noise. However, this port noise was only detectable when playing a bass sine sweep in the 30-40 Hz range at high levels. I don't notice the port noise when playing music though because the overall sound level is so much higher that it covers up any low level port noise that is present. So the Cerberus subwoofer is a great "music" subwoofer if you are looking to extend the bass response of a small pair of speakers and increase the power handling. If you need more output you can build two or more of them and at around $100 each you can't beat the price. It really is hard to believe how much deep bass can come out of that little 11" cube. 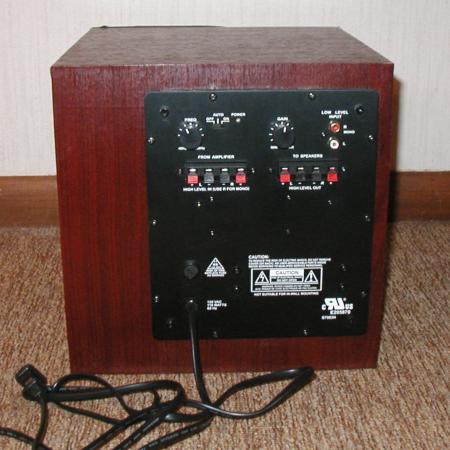
Microbe/Cerberus combinationThe Cerberus subwoofer truly is a great match for the Microbe and should reduce the amount of distortion in the sub-120 Hz range. t should increase the power handling capabilities of the Microbe, especially if you use a receiver as a high pass filter. It will extend the f3 from 50 Hz to 34 Hz. I hooked up this combination right next to my Astorius RS speakers to do a comparison and was surprised how good the Microbe/Cerberus combination sounds. I bet if you didn't know what set of speakers was playing and I played the Microbe/Cerberus combo first without playing the Astorius RS you would swear that you were listening to the three ways. The integration is that good and the bass is that deep.
In comparing the Astorius RS three way sound to the Microbe/Cerberus combo I noticed a few things. The Microbe speakers have a very warm and musical midrange sound to them. This makes them very easy to listen to and makes them well suited to rock music. The midrange warmth can seem a bit unnatural at times but in general it is a very pleasing sound. The Astorius RS seems like it has a bit more midrange definition which can probably be explained by the response plots and the sound is more natural overall with better midrange balance. However, the Astorius RS three way costs over three times as much as the Microbe/Cerberus combo. Some people may actually prefer the warmer sound of the Microbe/Cerberus combo because it is a bit more musical sounding and not harsh at all. I didn't pay much attention to the imaging and soundstage of the Microbe combo but they still seem pretty focused and have a lot of depth. So at approximately $300 in parts for a pair of Microbes with a Cerberus subwoofer I think you'll find it very difficult to find a system this small and inexpensive that will perform at this level. They really are quite remarkable considering the parts used. I think of all the designs I've made this combination would be the easiest to market because the performance to price ratio is so high that they can compete with systems several times their cost. Tang Band W6-1139SG/W6-1139SI driver performanceIt seems that Tang Band has once again changed the driver parameters and suffix for the 6.5" subwoofer driver used in this design. The fact is that this design was initially based on the "SB" version of this driver but I found that it still worked for the "SC" version that was sent to me. Tang Band next released the "SG" version and simulations revealed that the original enclosure design still worked well with the newer woofer model, perhaps better than the "SC" version, see below...-12L_36Hz.gif) I've gone ahead and remodeled the performance of the "SI" version with the original cabinet design and found that it performs more closely to the "SB" version that I based the original design on. Below is a plot of the performance in the current enclosure and it reveals that the new "SI" version of the driver performs quite well in the existing enclosure which is good news. 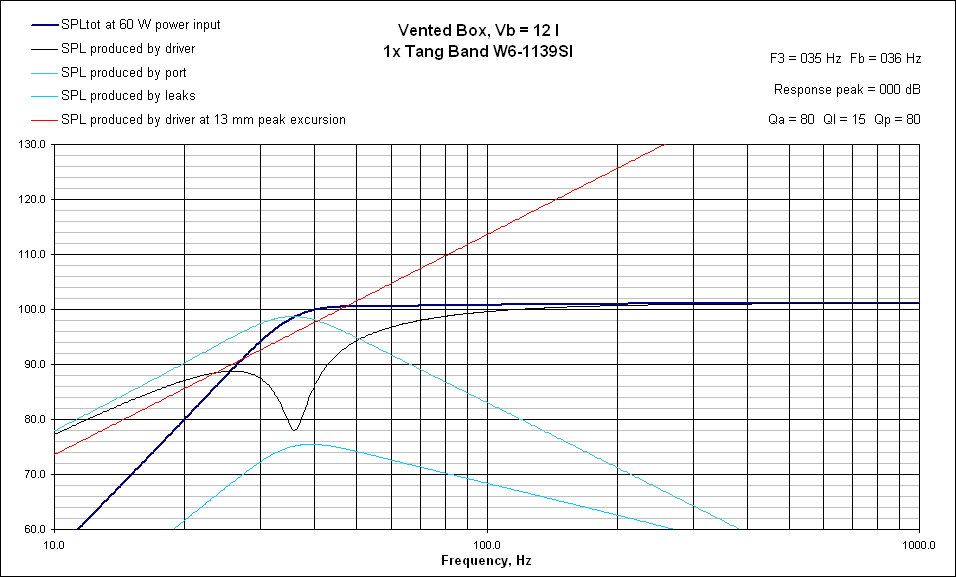 So as Tang Band continues to change the specifications and suffixes for this driver I'll try to keep on top of things but despite the driver going through 4 revisions (SB, SC, SG, SI) the cabinet has worked well for all of them. The funny thing is that the model that I built using the SC woofer was probably the least optimal combination of the bunch but still worked out well. So if you notice that Tang Band has come up with yet another suffix for this driver please let me know and I'll perform additional simulations to ensure proper performance.  |