


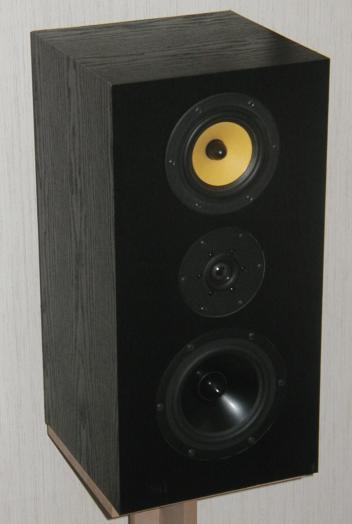
  IntroductionThe Hypnos is a stand-mounted three-way speaker design using the HiVi SD1.1-A 1" textile dome tweeter, HiVi F5 5" Kevlar/paper cone midbass and Dayton RS180 7" aluminum cone woofer. This speaker is a low cost, high performance design that sounds great with a wide range of music. Despite being a smaller, stand-mounted three way design I would consider this speaker to be a full range design due to the extension of the ported RS180. This speaker was tuned to be neutral and accurate. This design has a detailed midrange sound but performs well with both well recorded material and poorly recorded material. At a cost of around $300-$400 for parts this is a very high value design considering the performance.Project HistoryI received a pair of HiVi F5 midbass drivers from a fellow DIY'er a few years back. As time passed I came up with several different simulated designs for this driver but never built anything. I finally decided that I would use them for a small, budget two way design along with the HiVi SD1.1-A tweeter. I had a pair of speaker cabinets that were basically trash due to a design flaw but I was able to modify the midrange compartment to work with the F5 in a ported configuration. Now that I had this prototype two-way design mounted in my test cabinet I was able to start tweaking the sound to see how well these drivers would work in this configuration. I could get a nice midrange and treble sound but didn't like the sound below 300 Hz. I found the bass to be thin (much thinner than the Microbe design) and the lower midrange to have coloration not related to the crossover but most likely related to distortion. Using a subwoofer with this design improved the sound significantly but there were still issues with the lower midrange. It was at this point when I decided to turn this two-way design into a three-way design by adding the RS180 driver. The only downside to this is that the size and cost of the crossover increased dramatically but when comparing the before and after performance this added cost was well worth it. The RS180 basically turned a below average two-way speaker into an excellent, full-range three-way speaker.DriversHiVi SD1.1-A textile dome tweeter This high-quality tweeter utilizes a precisely coated diaphragm and a damping ring located below the dome. A special cast alloy faceplate offers excellent physical protection of the diaphragm, while also helping improve off-axis response. With a large, fully shielded magnet structure, ferrofluid, and aluminum former, the power handling is very good.HiVi F5 5" Kevlar/paper cone woofer The design of F5 has been optimized for dynamic bass reproduction in small vented systems as well as for midrange clarity and accuracy. The cone weighs less, is more rigid and has an improved damping factor. The driver utilizes a central phase plug to avoid air compression and internal air volume resonance. The plug improves frequency response and dispersion. The aluminum former voice coil and spider contributes to the linear operation of the driver at high power levels. The massive aluminum die-cast basket has been developed to minimize structural resonances. The shielded magnet structure allows the F5 to be easily incorporated into audio/video applications. The driver may be incorporated in a small box as a bass-midrange unit, when a subwoofer is employed. Recommended crossover frequency region for a two-way system design is 2-4 kHz. Dayton Reference Series RS180S-8 7" aluminum cone woofer The Dayton Reference Series sets a new standard of value in high-performance loudspeaker drivers. Utilizing a low-distortion motor system with two short-circuit paths and a rigid aluminum cone, the Reference Series can outperform drivers that cost several times the price. Their low-distortion characteristics and high excursion capabilities provide exceptional clarity, detail, and dynamics. Woofers feature a shielded motor system, black anodized cone, heavy-duty 6-hole cast frame, low-loss rubber surround, and solid aluminum phase plug. Cabinet DesignThe Hypnos cabinet is 11" wide by 11" deep by 22" tall. The midrange is placed above the tweeter making this an MTW design. The reason for this midrange placement was due to the sealed compartment required for the midrange. I had tried placing the midrange in the center of the cabinet with a previous design and this caused serious issues with the woofer compartment because it basically separated the woofer enclosure into two chambers connected by the space behind the midrange compartment. You might think that my choice of cabinet dimensions was poor due to two sides being equal and the height being twice the other dimension. This isn't an issue with this design for a few reasons. One is that the midrange compartment makes the height a bit shorter for part of the cabinet. The other reason is that the woofer is only operating below 300 Hz and standing waves based on the width/depth dimensions will be above this frequency. The RS180 chamber is rougly 24 liters with a port tuning in the upper 30's which in theory yields an f3 in the mid-to-upper 30's. The woofer compartment doesn't use any stuffing but has both 1.5" and 2.5" convoluted foam. The midrange compartment uses mostly 2.5" convoluted foam except for the top and bottom (so that it doesn't restrict the back of the F5) which is 1.5" convoluted foam. I used the 24"x18" pieces that Parts Express sells. I used one 2.5" thick sheet for the midrange compartment and used the extra foam in the woofer compartment (mostly on the bottom and top of the cabinet). I think it took about 2 (maybe 3) sheets of 1.5" convoluted foam for the rest of the cabinet. The midrange compartment has acoustastuff or polyfill to try to further reduce any internal resonances and increase the apparent volume. I made my cabinets out of 12" wide by 4' long 3/4" MDF shelving and a total of 6 shelves were required for a pair of cabinets. I prefer using smaller pieces like this because they are easier to work with, especially when ripping them to width on the table saw. I used the 2.5" diameter by 8.5" flared ports that Parts Express sells and cut 1" off of the end to get the desired tuning. The completed speaker weighs approximately 40 lbs. My pair are finished with black ash vinyl laminate available from Parts Express and I think that the black cabinet compliments the drivers well.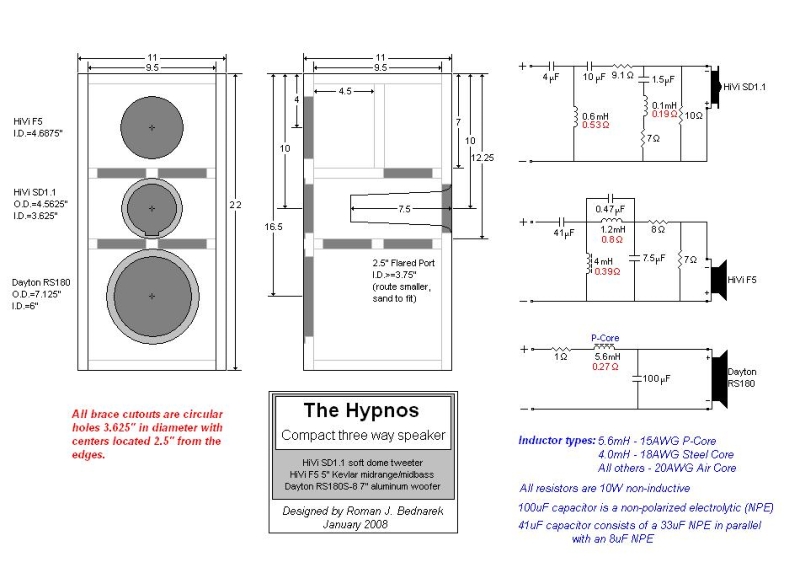
Crossover DesignThe Hypnos crossover design is shown on the blueprint above. As you can see this crossover has a quite a few parts with a total of 18 per speaker. However, every part added to the design is critical to providing the neutral sound that they have and a lot of the added parts are of minimal cost. The parts that make this design a bit more expensive are the two large inductors in the woofer and midrange filters. I chose to use steel laminate and P-core inductors for these values in order to keep the cost down. I had to add a 1 ohm resistor in series with the woofer P-core inductor to shape the response better. An air core inductor with a DCR equivalent to 1.3 ohms could be used instead of the resistor/inductor combo that I used. The resistance of this leg of the woofer filter is critical because it controls the output in the 100-200Hz range. If the total resistance is too small then there is a peak of a few dB in this region. If the resistance is too large the bass response will be attenuated too much but if you find that this design has too much baffle step compensation for your application this resistance can be increased to reduce the bass output. I used non-polarized electrolytic (NPE) capacitors for the 100uF and 41uF values (the 41uF value consists of a 33uF and an 8uF NPE in parallel). I used Dayton Metallized Polypropylene capacitors for the remaining ones. All of the resistors are Dayton 10W non-inductive resistors. Aside from the two large inductors, the rest of the inductors are 20 gauge air core inductors and the small gauge was chosen to reduce the cost but they don't hurt the performance at all.I'll explain the operation of each filter in detail. The woofer filter is just a basic 2nd order electrical filter which provides a 2nd order acoustic slope on the woofer with a crossover point of around 350 Hz. The midrange filter starts with a 2nd order electrical high pass filter. The low pass section of the filter uses a parallel notch filter which helps provide the proper slope as well as attenuating any cone resonances that the somewhat stiff Kevlar/paper cone has. This crossover point is around 2kHz and the slopes are roughly 4th order (actually they are mixed order slopes to compensate for the flat baffle). The tweeter filter is just a 3rd order electrical filter with an L-pad attenuation circuit. There is an added series notch filter which tames the rising response of the SD1.1-A tweeter. Please note that this design uses the "-A" version of the SD1.1 tweeter although it isn't labeled on the blueprint above. This "-A" version is distinguished by its shiny dome and it has superior performance over the "dull" dome version. Below is a picture of the crossover layout that I used. I managed to fit all of the parts on a 5" wide by 7" long piece of 1/2" MDF. The parts are pretty packed in but I was able to align most of the inductors in a perpendicular fashion and the one that isn't aligned this way should be far enough away so that there is no interference. All of the inductors are fastened to the board using nylon zip ties. I drilled extra holes in the board for the driver wires to pass through and two of the holes are for the screws that fasten the crossover board to the inside back of the cabinet. 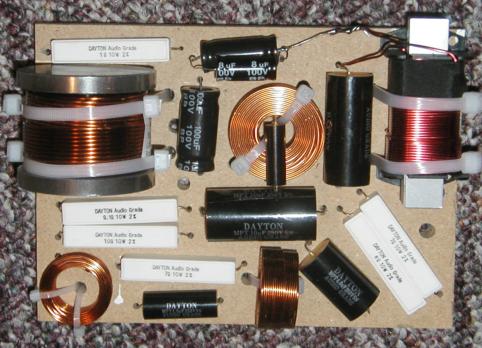
PerformanceShown below is the on-axis frequency response of the Hypnos design including the individual responses for each driver. Gated MLS measurements were used for all drivers and nearfield measurements were spliced below 200 Hz and 300 Hz for the woofer and midrange respectively. The phase alignment between the midrange and tweeter is excellent and the woofer/midrange phase alignment isn't perfect but is close enough. The dip in the crossover region between the woofer and midrange is intentional. Increasing the 41uF capacitor can flatten out this region but then the midrange sounds too warm. The dip in the crossover region between the midrange and tweeter is also intentional because, as you'll see below, there is a peak in the horizontal off axis response in this region. The sensitivity is around 82 dB for this design which is pretty low but that is the compromise that was made to have a full-range speaker in a compact, stand-mounted cabinet.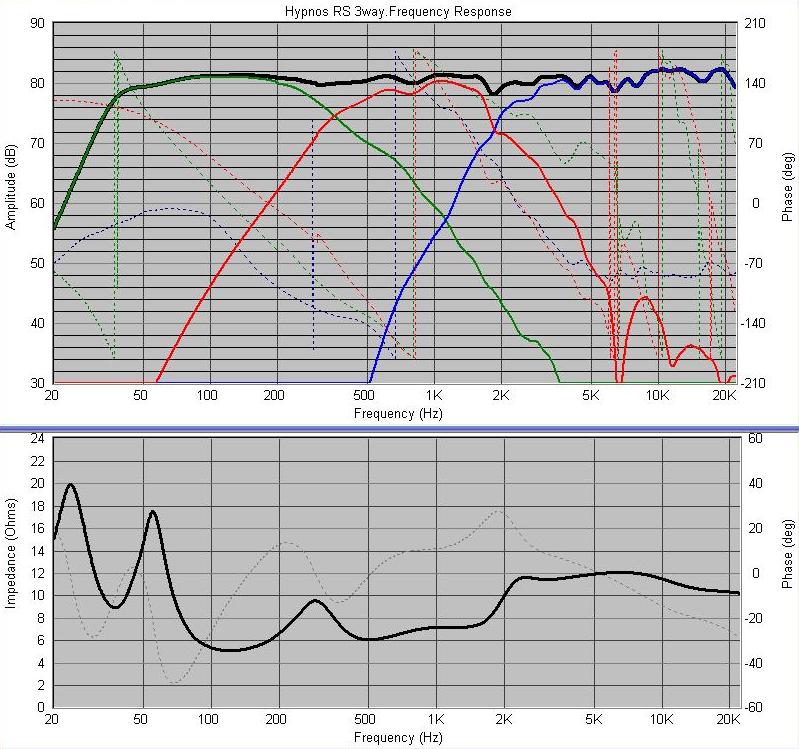 Off-axis PerformanceBelow is an interactive plot that allows you to see the responses of the Hypnos at various listening angles.
Listening ImpressionsMy main goal for this design was to tune the crossover for as neutral of a response as I could get using my ears as the judge. In the end I think I did a pretty good job of doing this. Tonally there aren't any frequency ranges that really jump out at you or sound recessed. I'm sure that they still have their own character as all speakers do but these speakers are fairly well balanced.In my opinion it is the performance of the HiVi F5 that really defines the character of this design. Unlike the M-130 used in the JDB3 design, the F5 provides a very detailed and clean midrange sound. The nice thing about the midrange is that while being detailed, they don't sound harsh. The use of the RS180 below 350 Hz really helped out the bottom end of the midrange which I felt was so-so when running the F5 full range. Based on my experience I've grown to like midrange drivers that have a good balance of stiffness and damping which the F5 provides. I've found that drivers with cones that are softer with more damping can lack detail while drivers with cones that are very stiff with little damping can sound a bit too detailed and harsh at times. The RS180 does a great job of covering the bottom few octaves. The bass extension is deep enough (in the mid 30's) to consider these a full range design but they don't quite have the authority that my other three-way designs which use a 8" ported woofers. The bass from these speakers is very balanced in my listening room and there aren't any frequencies that are too strong or too weak. As bass notes move up and down in frequency the levels seem well balanced. As I said before, the RS180 provides a cleaner lower midrange sound than the HiVi F5 below 300 Hz. The one thing that I noticed with the RS180 was that it seems to have a range of volume levels where it sounds best with regard to bass output. At very low levels the bass isn't very prevalent but at medium to high levels the bass comes alive. At higher levels beyond my normal listening levels the RS180 begins to compress a bit. I wouldn't expect rock concert levels out of these speakers but they play plenty loud for me based on my listening tastes. Considering that it only costs around $12 the HiVi SD1.1-A does a pretty good job but I wouldn't put it in the same class as the more popular $30+ tweeters. It seems to do a good job of complimenting the upper midrange and lower treble region but gets a little bit spitty above this point. This is mostly noticeable with cymbals which sometimes tend to have a similar character between different recordings. Despite these characteristics I don't find this tweeter to be harsh. It seems to have a lot of the characteristics common to fabric dome tweeters like more of an emphasis on the shimmer of a cymbal and less of an emphasis on the fundamental ring. I find that most metal dome tweeters are the opposite in this regard. The soundstage and imaging characteristics are good but in an unusual way. I'll first define what I consider to be imaging and soundstage. I consider imaging to describe how focused an instrument is within the soundstage. Poor imaging means that it is difficult to localize the instrument and it seems blurred in space. Soundstage defines the placement of those images within and beyond the speakers. I've often found that some speakers that have a huge soundstage often have poorer imaging. These speakers are the opposite and have good imaging at the sacrifice of some soundstage depth. They do a great job of separating each instrument within the soundstage but don't really spread sound out beyond the speakers unless the recording has the spatial cues to do so. The ability to distinguish each instrument within the soundstage makes these speakers less fatiguing especially if there is a lot of stuff going on in the midrange which is part of the reason why I find these easy to listen to with a wide range of music. Along with the midrange clarity, the definition of each instrument give these speakers a level of clarity that my previous RS180 design (the JDB3) lacked. It is typical for a set of speakers to sound good with one type of music or recording and poor with another. A speaker that has a lot of detail can often be harsh with poor recordings but sound exceptional with a great recording. A speaker that lacks detail is usually the opposite because the smoothness hides any imperfections or doesn't let all of the recording through. The Hypnos design is pretty rare in the fact that they sound great with all types of recordings and music. The detail in the midrange allows all of the nuances of a good recording come though. The ability to separate instruments within the soundstage makes poor recordings more tolerable. They aren't as smooth as some speakers with poor recordings but they aren't harsh either. In general this speaker doesn't make every great recording sound great or every poor recording sound poor. It has a way of balancing the performance regardless of the quality of the signal sent to it but in general just about everything I've demoed them with sounds pretty good to my ears. ConclusionSo in summary I consider the strengths of this speaker design to be the fairly neutral and detailed sound with good imaging and relatively deep bass considering the cabinet size. The weaknesses are the treble clarity and the soundstage width/depth. To build a set of Hypnos speakers each speaker uses about $60 in crossover parts and $85 in drivers so not including cabinets, damping material, terminals and ports these speakers cost under $300 for a pair. All of the parts are available from Parts Express. Adding the remaining parts including cabinets still keeps them under $400 for a complete pair of speakers and considering the performance of this design that is a bargain. However, depending on your tastes you may or may not like these as much as I do. I still think that they exceeded my expectations when I set out to design these speakers.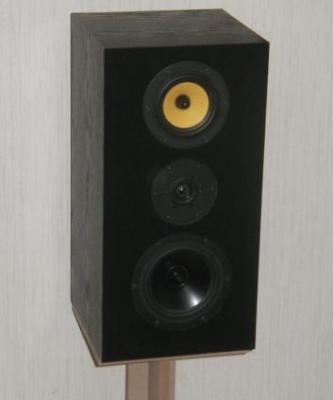 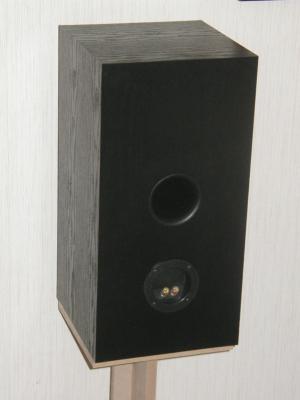  |