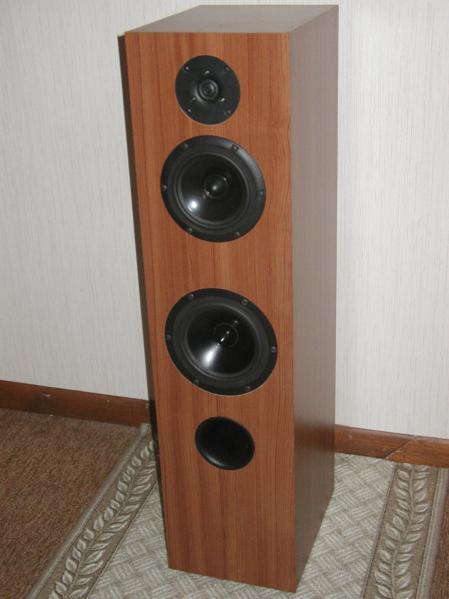

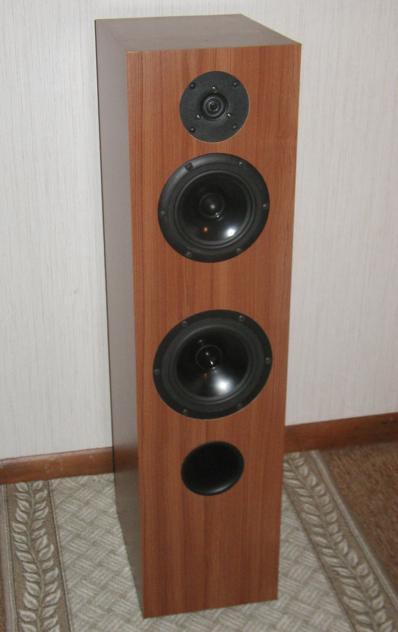
IntroductionThe JDB3 is a floorstanding 3 way speaker using the Dayton RS180S-8 7" aluminum woofer, GR Research M-130 coated paper midrange and Vifa XT19TD00-04 3/4" ring radiator tweeter. These were built for my best friend using mostly spare drivers and I used his initials to name them. To suit my friend's listening tastes I designed these speakers to sound smooth and non-fatiguing with rock music. In the end I arrived at a speaker that sounds great with just about any type of music. In general these speakers have a fairly neutral presentation. They are not extremely detailed but there is still a great level of clarity without being harsh and they aren't muddy. The f3 is in the mid-to-upper 30s and the sensitivity is around 82 dB. The cost of parts is under $500 for a pair.DriversVifa XT19TD00-04 3/4" dual concentric ring radiator fabric dome tweeter This superb 3/4" tweeter features a patented dual concentric diaphragm and a unique wave guide center plug which provides excellent on and off axis response. The smaller voice coil diameter takes the dual concentric concept even further, providing even greater high frequency extension and off-axis performance. Unshielded variety; recommended for high crossover points.
Cabinet DesignThe JDB3 actually went through two cabinet design iterations. Initially I tried to make them stand-mounted speakers but there were fatal flaw with that design which involved resonances caused by the midrange compartment. The problem was that the midrange compartment separated the woofer compartment into two cavities connected by a narrow passageway. This caused resonances that showed up in the port output, impedance and woofer output. The use of stuffing reduced the resonances but also reduced the port output at the same time. So after countless attempts at repairing those cabinets I just went ahead and built a new set of tower cabinets.The final cabinet design is shown in the blueprint below (click on pic for a larger image). The cabinet is a basic, 36" tall rectangular box that is separated into two compartments. The woofer compartment is roughly 28L (1 cu. ft.) and is ported with a 2.5" flared port (Parts Express) with a tuning of around 36 Hz. The midrange compartment is roughly 14L in volume which is oversized but should produce a more open midrange sound. Only the tweeter and woofer are flush mounted into the cabinet because the midrange driver has a flange suited for surface mounting. I constructed my cabinets completely out of 15" and 12" wide 3/4" MDF shelving which are easier to work with especially around a table saw. I used both 1.5" and 2.5" convoluted foam lining throughout the cabinet. All side walls use 1.5" foam. The remaining walls of the midrange compartment as well as the top/bottom walls of the woofer compartment use 2.5" foam. I used 1.5" and 2.5" foam for the remaining walls of the woofer compartment based on what remaining material I had. The midrange compartment is stuffed with about a half a pound of acoustastuff and the woofer compartment is not stuffed at all. I found that stuffing the woofer compartment reduced the port output and preferred the extra bass output that was present when there was no stuffing. The cabinet uses 4 braces to reduce resonances. One of the braces is solid and separates the midrange and woofer compartments. The remaining three braces are basically window braces that have two 5.5" by 3.75" rectangles cut out of them which leaves a 1" border of material. I used self-stick Teak vinyl covering for this pair because it is fairly easy to apply and doesn't look too bad. Since the tweeter height is only around 33" which is a bit low for most seating arrangements I decided to use two rubber feet near the front of the cabinet. They help to tilt the cabinet back slightly which raises the listening height a bit. I used 5/8" tall feet which effectively raise the tweeter height by 5" (to 38") at a listening distance of 8' away. If you have a higher listening height then you can just use some taller feet. 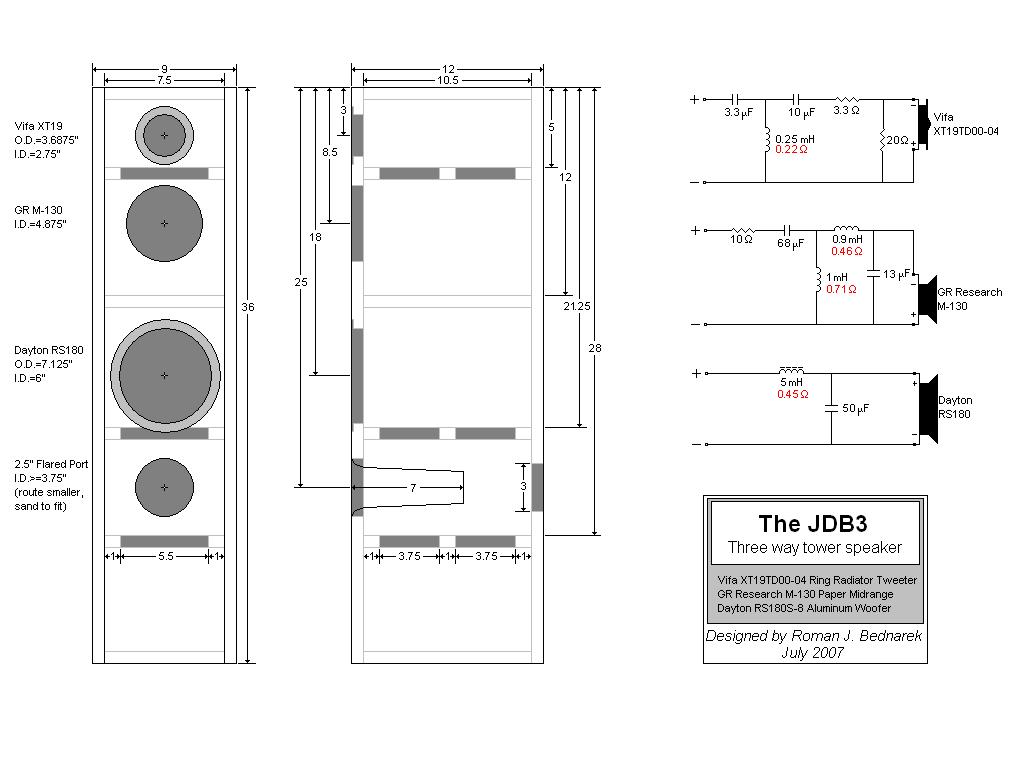 Crossover DesignThe JDB3 uses a very basic and simple crossover but it still gets the job done. I used 2nd order slopes between the RS180 and M-130 with a crossover point of 500 Hz. I used 4th order slopes (well actually mixed order slopes with a shallower midrange slope to compensate for flat baffle acoustic offset issues) betwen the M-130 and XT19 with a crossover point of around 3kHz. Since most 2nd order filters require a phase reversal of the drivers I connected the RS180 in phase and the rest of the drivers with backwards phase. This is the way I've done all of my three way designs so far and it has worked well. The woofer filter is just a basic 2nd order electrical filter using a steel core inductor for lower DCR and a non-polarized electrolytic capacitor to save on cost and space. Since the crossover point is low enough the natural resonance peak of the RS180 is attenuated enough so it doesn't require additional notch filtering. The M-130 uses 2nd order high and low pass filters with a series resistor for attenuation. The RS180 turned out to be less sensitive than its spec. indicates so I had to attenuate the M-130 a bit more than I expected hence the need for the 10 ohm resistor. Since the M-130 has a fairly smooth response a simple filter was enough to provide a neutral sound. I used a non-polarize electrolytic capacitor for the large value which once again saves money and space. The tweeter uses a 3rd order electrical filter with a resistive L-pad for attenuation, nothing fancy there. So in the end we have a three way crossover that only uses 12 parts. For this particular filter I used all Dayton 10W non-inductive resistors but used two in parallel for the midrange circuit. I used 18 and 20 gauge Jantzen air core inductors for all values except the 5mH inductor which is an 18 gauge steel core inductor. All smaller capacitors are metallized polypropylene and I happened to use the Dayton brand.All of the resistors are Dayton Audio brand 10W non-inductive resistors which include the 3.3 ohm and 20 ohm values used in the tweeter filter. In my crossover layout shown below, the 10 ohm midrange resistor is actually a 16 ohm and a 30 ohm 10W non-inductive resistor placed in parallel in order to provide 20W of total power handling (that's just what I had on hand, however I would suggest using two 20 ohm resistors instead, which would share the power better and still provide 10 ohms overall). The 0.9 mH and 0.25 mH inductors are 18 gauge air core and the 1.0 mH inductor is a 20 gauge air core. Despite what is shown in the layout below, the crossover schematic above indicates an 18 gauge steel core inductor which should work fine and is much more affordable since the cost of copper has risen recently. I chose to use NPE (Non-polarized Electrolytic) capacitors for two larger capacitor values of 50uF and 67uF considering that they are much more cost effective and physically smaller. I chose Dayton Metallized polypropylene capacitors for the remaining values because I feel they offer a good level of performance for the price. The 13 uF value is made from a 10 uF and a 3 uF cap placed in parallel. 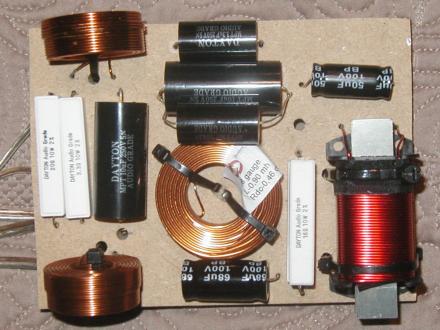 Performance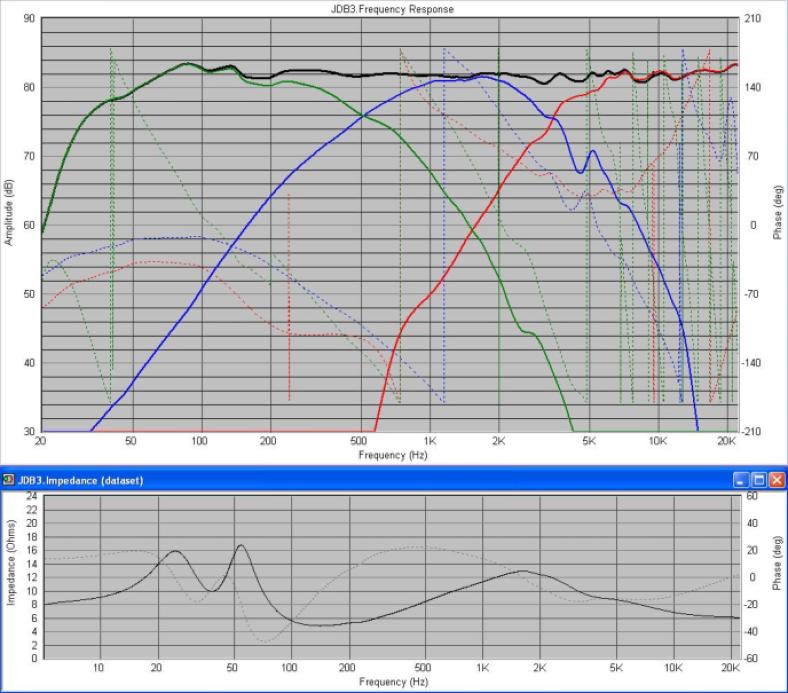 The frequency response is easily within +/-2 dB across the spectrum. The sensitivity is around 82dB which is a bit low but they seem to be able to still play quite loud if you give them enough power. The bass response from this plot can be misleading but the true f3 in the mid-to-upper 30 Hz region. The phase alignment between the drivers is decent in the crossover regions. The response indicates a fairly neutral sound with a little bit of upper bass warmth. The impedance response is fairly tame although it does dip down to about 5 ohms in one spot. Based on some specs I've seen in the past I would still consider this speaker to be close to an 8 ohm nominal load. I think that it should be an easy enough load for most mainstream amps anyway. Listening ImpressionsI had been listening to my Alpheus MkII speakers for the past few weeks but I decided to hook up the JDB3 speakers for a final evaluation. I'll start by saying that the JDB3 design definitely sounds like a three way design because it has nice clean mids and deep bass despite only using a single 7" woofer. Most two way designs either suffer in the midrange or the bass as there is often a tradeoff in performance for a driver that tries to cover that wide of a range. The RS180 has been used in two way designs before with success and although I haven't tried it in that configuration, I tend to prefer using aluminum drivers below the midrange frequency range. I prefer the distortion profile of a coated paper cone which is why I chose the M-130 for that range. The M-130 has lower odd order distortion in the midrange than the RS180 but may suffer from slightly more even order distortion. To my ears odd order distortion can be harsh and more easily detectable than even order distortion which is musically (octave) related to the fundamental tone. This design, like my favorite Alpheus MkII design, uses the optimal combination of driver materials based on my tastes. I like stiff cones for bass frequencies so that there is less flexing. Paper-like cones work well in the midrange because they have more damping but do suffer from some flexing which is why I usually prefer the stiffer models. The curvilinear cone of the M-130 has some advantages and that driver has a naturally smooth response in the midrange. I've found that fabric tweeters provide a nice sound in the upper frequency range and the Vifa XT19 has very low distortion.In general the JDB3 speakers are fairly neutral but do have a slight emphasis on the upper bass region and the midrange is a just a bit on the warm side which contributes to their smoothness. The treble is balanced but can seem a bit weak at times compared to some of my other designs. The treble isn't lacking but it doesn't shout at you like some speakers can. I've always liked the XT19 tweeter and it really doesn't do anything wrong in this design. The crossover point is more than high enough for the tweeter so the sound is smooth even at higher levels. The M-130 contributes to most of the JDB3 design's sound and I think it does a great job. I almost used a Hi Vi F5 Kevlar/paper driver instead but the ragged response scared me a bit and I felt that the M-130 would be better suited for the rock music that my friend listens to. Clarity and smoothness are the best two words to describe the midrange of the M-130. It doesn't have quite as much detail as the 830881 that the Alpheus MkII uses but that sacrifice is made for added smoothness without muddying the sound. The RS180 produces a detailed, tight bass sound and also contributes to some of the lower midrange clarity of the design. With the 2nd order slopes the transition between the midrange and bass drivers sounds seamless despite the difference in cone materials. I'll admit that the ported RS180 doesn't quite have the bass impact that the L22 does in my Alpheus MkII design but it isn't a slouch either. You can definitely feel the bass from the RS180 and they can handle power levels beyond my threshold in my medium sized listening room in most cases. They do eventually reach a point where the sound starts to "compress" and the midrange gets harsh but I would guess that the output is over 100 dB by that point. I do find however that I like to turn them up a bit at times because they are so smooth and don't bother my ears at higher levels like some speakers can. The other main difference between the JDB3 and the Alpheus MkII is the midrange character. The Alpheus MkII has more detail in the midrange but can sound a bit thin sometimes. The fuller, warmer midrange of the JDB3 can sound more natural with vocals at times and does a good job of taming harsher recordings. Both midranges have and appealing quality, it just depends on what your listening preferences are as to which one might sound better to you. Every speaker has a certain "character" to its sound. As a designer my goal is to come as close to neutral as possible while living with the character of the drivers and design in general. With this speaker my goal was to design a neutral sounding speaker that wasn't harsh and that's what I got in the end. The character of these speakers make them enjoyable with just about any type of music. This is a good characteristic in my opinion because it makes it easier to dig deeper into your recordings and listen to stuff that normally wouldn't be tolerable on a super detailed pair of speakers. These speakers still sound great with nice clean, well recorded material as well but you might not get every last speck of detail out of the recording like you can with some speakers. I think that these speakers would suit a fairly diverse crowd of listeners based on their qualities. To summarize, the JDB3 speakers are a pretty versatile set of speakers because they sound well with a lot of different types of music and aren't fatiguing. Their sensitivity is a bit low but they can handle some power to play at higher levels. However, if you are looking for rock concert levels you'll need a bigger set of speakers. They won't squeeze every last ounce of detail out of the recording but then again they won't reveal every little flaw in the recording. They have this quality but still are able to convey the recording accurately. At around $500 a pair for parts (including Teak vinyl laminate), this speaker does quite well. One of my friends gave them quite a compliment when he stated that he hasn't heard another pair of speakers for under $5,000 that sounded better. 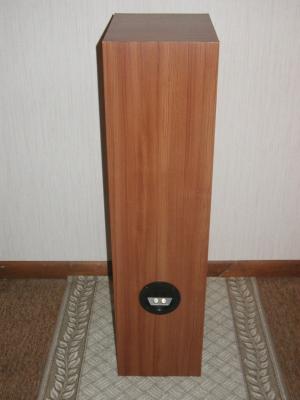 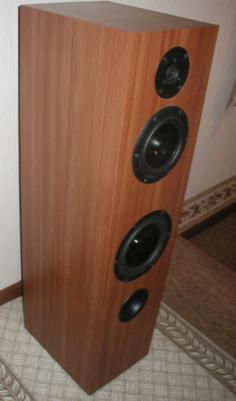  |